
In today’s digital age, we often find ourselves needing to capture and share screenshots for various purposes. Whether it’s to highlight an error message, share a funny moment, or illustrate a step-by-step guide, screenshots have become an essential tool. While there are numerous ways to take screenshots on your Mac, in this blog post, we will explore three different methods. From using keyboard shortcuts to employing the Grab utility and utilizing the Preview app, we will guide you on how to effortlessly capture screenshots on your Mac.
Using Keyboard Shortcuts For Screenshots
Are you wondering how to easily capture screenshots on your Macbook? Look no further! In this blog post, we will explore the convenient method of using keyboard shortcuts to take screenshots on your Macbook. Whether you need to capture the entire screen, a specific window, or just a portion of the screen, keyboard shortcuts provide a quick and efficient way to do so.
When it comes to taking screenshots on a Macbook, keyboard shortcuts are your best friend. They allow you to capture images without the need for any additional software or tools. Let’s take a look at some of the most commonly used keyboard shortcuts for screenshots:
- Command + Shift + 3: This shortcut captures the entire screen and saves the screenshot as a file on your desktop.
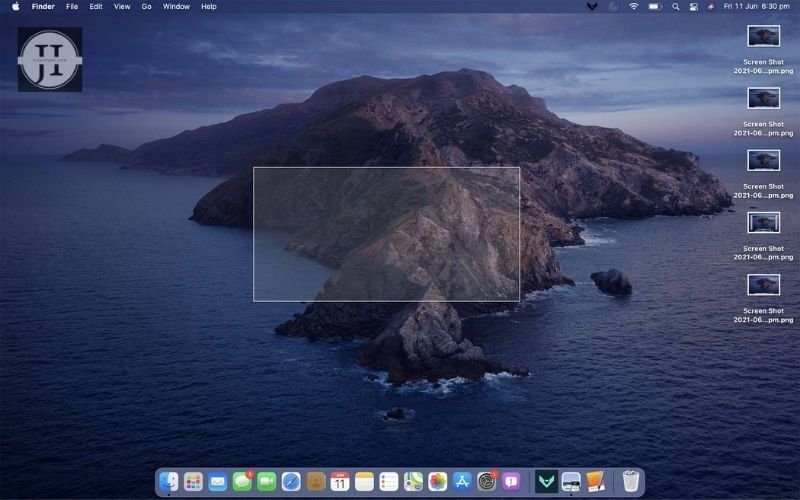
- Command + Shift + 4: With this shortcut, your cursor turns into a crosshair, allowing you to select a specific portion of the screen to capture. Simply click and drag to create a selection, and release the mouse button to take the screenshot.
- Command + Shift + 4 + Space: This shortcut enables you to capture a specific window or application. Once you press the combination, your cursor will change to a camera icon. Move the camera icon over the window or application you want to capture and click on it.
These keyboard shortcuts are incredibly handy and can save you a lot of time when you need to capture screenshots on your Macbook. You can easily share these screenshots with others or use them for various purposes, such as creating presentations, documenting issues, or showcasing your work.
So, next time you need to take a screenshot on your Macbook, remember these keyboard shortcuts. They are simple, efficient, and readily available at your fingertips. Give them a try, and you’ll wonder how you ever got by without them!
Using The Grab Utility For Screenshots
The Grab utility is a built-in screenshot tool for Mac users that offers more advanced features compared to the basic keyboard shortcuts. It allows you to capture specific areas, windows, or the entire screen, as well as set a timer before taking a screenshot. To access the Grab utility, navigate to the Applications folder, then go to Utilities and select Grab.
Once you have opened the Grab utility, you will find four different options: Selection, Window, Screen, and Timed Screen. These options can be found in the menu bar under the Capture tab. The Selection option allows you to capture a selected area on the screen by simply dragging the cursor over the desired area. Similarly, the Window option enables you to capture a specific window after clicking on it.
Alternatively, if you want to capture the entire screen, you can choose the Screen option. This will capture the entire display, including multiple screens if you are using more than one. Lastly, the Timed Screen option provides a delay of 10 seconds before capturing the screen, allowing you to set up your desired screen arrangement or open specific applications before the screenshot is taken.
Using the Grab utility, you can adjust the settings for the screenshots you take. Under the Capture tab, select Preferences to access a variety of options. You can choose to include the mouse pointer in your captures, set a keyboard shortcut, change the default format and save location, and even enable sound when a screenshot is taken.
| Shortcut | Description |
|---|---|
| Command + Shift + A | Opens the Applications folder |
| Utilities | Navigates to the Utilities folder |
| Grab | Selects the Grab utility |
In conclusion, the Grab utility is a versatile tool for capturing screenshots on your MacBook. Whether you need to capture a specific area, window, or the entire screen, the Grab utility has you covered. Its additional features, such as timed captures and customizable settings, make it an excellent choice for users who require more functionality than what the basic keyboard shortcuts offer.
Taking Screenshots With The Preview App
When it comes to taking screenshots on a MacBook, there are several methods you can use. One popular option is using the Preview app, which is a versatile tool that allows you to not only view images and PDFs but also capture screenshots. In this blog post, we will guide you through the process of taking screenshots with the Preview app, making it easy for you to capture and save anything you see on your screen.
To begin, open the Preview app on your MacBook. You can do this by searching for “Preview” in the Launchpad or locating it in the Applications folder. Once the app is open, go to the menu bar at the top of the screen and click on “File”. From the dropdown menu, select “Take Screenshot”.
Here, you will see three options: “From Selection”, “From Window”, and “From Entire Screen”. Each option corresponds to a specific type of screenshot you can take. If you want to capture a specific area on your screen, choose “From Selection”. To capture a specific window, select “From Window”. And if you want to capture the entire screen, choose “From Entire Screen”.